29 November 2015

Gift ideas for Christmas

Here is a little list of ideas for Christmas presents. All items comes from Etsy, so everything is handmade. Hope you like them, Happy shopping! 

Gifts for her:

Long sleeves tunic top by AryaSense  £47.10


 Silver cat necklace by mostlikelyShop £72.40 

Gifts for him:


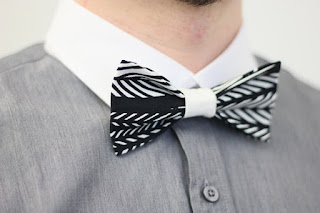
One of a kind bow tie by cyou2nite £11.00


Natural wood felt slippers by aikafeltworks £47.27 


Gifts for a kid:


Minijungle by milimbo £8.69


Wooden Camera by BublyMoon £15.00
Babies Rattle  by  LizzieSimpsonDesign £27


Household gifts 


Decorative pillow cover by sandraarduiniphoto £20.48


Set of 2 pot holders  by Bohelina £23.21


3 set of bird wall hooks by Dubudumo £12.97 


28 November 2015

Geometric necklaces - bow tie alternative PART 1

I became bored of all accessories that I have. When I go buy some new ones I always fine same stuff in all shops. Repetition of "style". Boooring!! I wanted something original and something that describe me. Style I like is of course simple lines, geometric pattern, nothing complicated. So here is what I came up with. 


I combined bits and pieces of quality leatherette and create something like bow tie alternative. Now I can bring life to a boring single color shirt or any plain top. It is very easy to make and you can do it yourself, but If you don't have time or don't feel like doing something, you can also order same in my shop. This one is listed here


Another necklace very similar to the first one. It is very simple to make. It's all about combining right colors and shapes together and that's it! Here is link to this necklace if you like it.
  
The necklace above is my favorite. It goes well with plain black shirt. You can find more details here


Vivid colors like Yellow can add very nice finish to your outfit. This necklace  is a combination of quality yellow, black and white leatherette and there are also white studs in the middle with tiny black and yellow freckles. For more pictures, info and price please click here .


This diamond shape necklace goes well with collars, but it also look nice on a loose top:


If you like these you might also like my whole range of geometric accessories. Feel free to visit my shop.   
Thank you! 


13 June 2015

Photo book converted into Jewelry organizer

Do you also have those days when you are in hurry and you can't  find  that necklace that goes well with your dress? Your jewels are all over the place, some are in a bathroom, some in a wardrobe, some in a bag. You end up running from one room to another and at the end you decide to wear no accessory at all, because nothing is as good as that damn  necklace that you bought just last week. Where did I put it???

So, as I like recycling I decided to to convert an older photo book into jewelry organizer. I like its cover so much that I thought it would be nice to look at it more often. The cover is a beautiful Japanese style silk fabric in light purple color with golden embroidery.   


I pierced pages with a  needle. Then I pull through a little black hair clips that I used as a jewelry holders. 


All my necklaces, earrings, bracelets are now  at one place


And it's easy to store


Now I can enjoy and actually see all my jewels and of course  save a lot of time in the morning too! 

11 June 2015

DIY - Hand painted wood necklace


This necklace is so easy to make,  all you need is:

- piece of wood (ideally flat, polished &  pre-drilled) I used my old earring so that was easy  
- tape (either masking tape or just an office tape)
- nail varnishes of your choice


And then just simply use a tape to create straight line and to cover the parts that you don't want to paint. Wait until first coat dry up, remove tape and then apply new tape in different angle. Apply second nail varnish and then third and so on.. You can create amazing geometric shapes just under 5 minutes.  Go ahead, show me yours! 


28 March 2015

Blouse alteration

I've been watching The Great British Sewing Bee  lately, which I endlessly love and everytime I watch it  I want to dust off my sewing machine and do something amazing. So last time I watched one of the episodes when I decided to do some garment alteration. I have many items piled up in my wardrobe which I don't wear but can't bin as they mean something to me or reminds me some special occasion or I have some items that I haven't even worn as they were given to me as a gift and aren't 'my cup of tea' if you know what I mean... So I've told myself why don't you change these slightly and make them either wearable or alter them to something completely different. Here is the first alteration and I hope you like it! 


I had this blouse only for couple months, but I didn't wear it as I didn't like the collar and wide sleeves, therefore these were first 2 things I removed from the blouse immediately. 


I used existing collar and sleeves as a pattern so I didn't have to measure the blouse again or create new pattern. As material I used black leatherette (faux leather) that you can buy in any shop with fabrics. You can buy various type of faux leather from heavy duty to very thin letherette. In my opinion medium  leatherette is the best as it still look like leather and it's easier to sew and shape. 


Once I cut the shape of sleeves and collar I pinned and sew onto the blouse and cut it to the wanted length/shape.


I've also added a piece of leatherette onto button's line matching the width of the line and sew on new black buttons on top of it. 


And that's it! The new blouse has been born :) I think it will be my favorite this summer :) 


27 March 2015

DIY Origami Rug

I always get excited to find any new Origami  DIY project on Pinterest and can't wait to dive into it. Last time I did  Felt Table mats and I enjoyed it so much that I decided to do something similar but in a bigger scale. So.. Here it is .. The Origami rug!


At the time I didn't realize that doing this project in bigger format will take weeks/ maybe months? I usually started at evenings after dinner while watching TV. I didn't have to concentrate as this requires repetition of the same thing on and on again. I felt like a machine! But I enjoyed doing it and I think the result is great, I love my new carpet in our dining room.

 My little helper likes it too!

Below are couple pictures from work in progress. If you want to try to give a go, please visit this amazing blog  'How about orange' where you can download pattern and follow easy steps.

 I have chosen different material rather then felt this time. I used thin carpet, which wasn't probably great choice as it wasn't easy to fold or cut, but at the end it is a carpet so I wanted to go for something durable. If you use felt you will have to reinforce  it with some heavy duty iron or sew on underlay.
Pattern and step by step can be found  here
What you can see below took me about 6 evenings to finish. Yes, there is a lot of cutting, folding, and cutting again involved but I am sure you will love the result of your work at the end, like I did.  

If you find any more interesting origami projects, feel free to share here. I can't wait to make more. Thank you for reading :)